Termux安装与使用
Termux 是运行在 Android 上的 terminal。不需要root,运行于内部存储,自带了一个包管理器,可以安装许多现代化的开发和系统维护工具。
下载与安装(官网)
Termux | F-Droid - Free and Open Source Android App Repository
配置
1.替换国内源
图形界面(TUI)替换
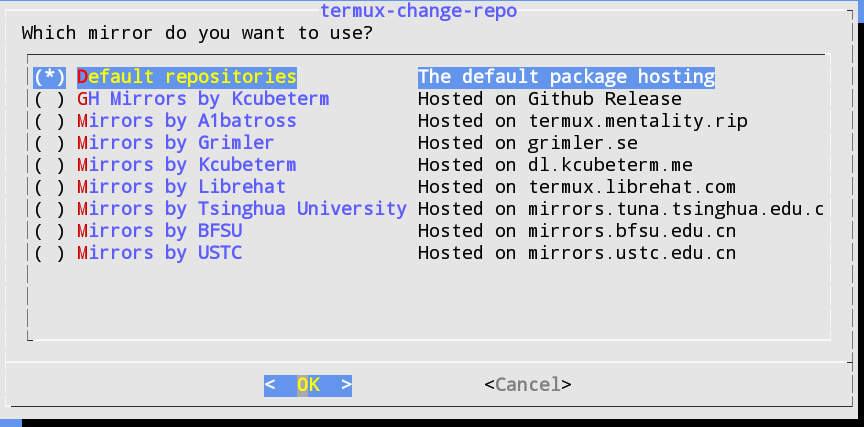
在较新版的 Termux 中,官方提供了图形界面(TUI)来半自动替换镜像,推荐使用该种方式以规避其他风险。 在 Termux 中执行如下命令
termux-change-repo
在图形界面引导下,使用自带方向键可上下移动。


2.安装完整的Linux子系统
安装proot-distro
Termux 提供了一个包proot-distro,它负责管理 Termux 内的 Linux 发行版。您可以通过执行安装此实用程序
pkg install proot-distro
目前它支持这些发行版:
- Alpine Linux (3.14.x)
- Arch Linux / Arch Linux 32 / Arch Linux ARM
- Debian (stable)
- Fedora 34
- Gentoo
- OpenSUSE (Tumbleweed)
- Ubuntu (20.04)
- Void Linux
要安装发行版,只需运行以下命令:
proot-distro install <alias>
其中“
安装后,您可以通过执行下一个命令来启动 shell 会话:
proot-distro login <alias>
以下是可用的 proot-distro 功能的基本概述:
proot-distro list- 显示支持的发行版及其状态.proot-distro install- 安装发行版.proot-distro login- 启动发行版.proot-distro remove- 卸载发行版.proot-distro reset- 重新安装发行版.
安装Linux
proot-distro install ubuntu #安装ubuntu
echo 'proot-distro login ubuntu' > .bashrc #自启动Ubuntu
Oh My Zsh
apt update
apt install git zsh
sh -c "$(curl -fsSL https://raw.github.com/ohmyzsh/ohmyzsh/master/tools/install.sh)"
git clone https://github.com/zsh-users/zsh-syntax-highlighting.git ${ZSH_CUSTOM:-~/.oh-my-zsh/custom}/plugins/zsh-syntax-highlighting
git clone git://github.com/zsh-users/zsh-autosuggestions ${ZSH_CUSTOM:-~/.oh-my-zsh/custom}/plugins/zsh-autosuggestions
vi ~/.oh-my-zsh/themes/my.zsh-theme 设置自用主题
local ret_status="%(?:%{$fg_bold[green]%}➜ :%{$fg_bold[red]%}➜ )"
PROMPT='${ret_status}$USER@%m %{$fg[cyan]%}%d %{$reset_color%}$(git_prompt_info)'

ZSH_THEME_GIT_PROMPT_PREFIX="%{$fg_bold[blue]%}git:(%{$fg[red]%}"
ZSH_THEME_GIT_PROMPT_SUFFIX="%{$reset_color%} "
ZSH_THEME_GIT_PROMPT_DIRTY="%{$fg[blue]%}) %{$fg[yellow]%}✗"
ZSH_THEME_GIT_PROMPT_CLEAN="%{$fg[blue]%})"
.zshrc设置
#修改主题与插件
ZSH_THEME="my"
plugins=(git zsh-syntax-highlighting zsh-autosuggestions wd extract)
设置中文
apt install language-pack-zh-hans
echo 'LANG=zh_CN.UTF-8' > /etc/default/locale
其他
修改字体配色
长按屏幕点击More打开设置---->Style---->安装Termux:Styling
修改欢迎语
vi ../usr/etc/motd

Termux修改DNS
echo 'nameserver 114.114.114.114' > ../usr/etc/resolv.conf


